Adding Comments to the Enhance Blog Template

by Simon MacDonald
@macdonst
@macdonst@mastodon.online
on

Recently, we released the Enhance Blog Template, and one thing I felt was missing was the ability to have random people on the internet disagree with me. That’s right. We’re adding a comment section.
Prerequisites
Install the Begin CLI as we will be using it to generate some code.
Getting Started
In order to super-charge our development, I will use the Begin CLI to scaffold our comments API routes and database access layer. From your terminal run:
begin generate scaffold Comment name:string email:email \
comment:string date:string slug:string
The scaffold command creates the following database backed API routes for you:
app/api/comments.mjs
- GET  /comments            # list all comments
- POST /comments            # create new comments
app/api/comments/$id.mjs
- GET  /comments/$id        # read one comment
- POST /comments/$id        # update a comment
app/api/comments/$id/delete.mjs
- POST /comments/$id/delete # delete a comment
We won’t use all of those API routes in this example, but you should be aware of how easy it is to get started building a CRUD app with the scaffold command.
New UI Components
While the scaffold command created a bunch of UI components for us they don’t match the design of the blog template so we are going to create some new components. The components created by scaffold are intended to get you up and running quickly but we expect you will end up removing them from your project and/or replacing them with your own implementations. When you do please share your designs on the Enhance Discord.
Create these four new files in your project.
export default function FieldSet ({ html, state }) {
 const { attrs } = state
 const { legend } = attrs

 return html`
   <style>
     fieldset {
       border: 3px solid hsl(0deg 0% 35% / 15%);
     }

     @media (prefers-color-scheme: dark) {
       fieldset {
         border-color: hsla(0deg 0% 85% / 30%);
       }
     }
   </style>

   <fieldset class='mt0 mb0 p0 font-body'>
     <legend class='font-heading p-2 text3'>${legend}</legend>
     <slot></slot>
   </fieldset>
 `
}
export default function SubmitButton ({ html }) {
return html`
<style>
button {
background-color: var(--color-dark);
color: var(--color-light);
-webkit-font-smoothing: antialiased;
-moz-osx-font-smoothing: grayscale;
}
@media (prefers-color-scheme: dark) {
button {
background-color: var(--color-light);
color: var(--color-dark);
-webkit-font-smoothing: unset;
-moz-osx-font-smoothing: unset;
}
}
</style>
<button type='submit' class='pt-3 pb-3 pl0 pr0 font-semibold'>
Submit
</button>
`
}export default function TextArea ({ html, state }) {
const { attrs } = state
const { id, label, name, type } = attrs
return html`
<style>
textarea {
background-color: transparent;
box-shadow: 0 0 0 1px hsl(0deg 0% 30% / 50%);
resize: vertical;
min-height: 6rem;
}
textarea:focus {
outline: none;
box-shadow: 0 0 0 2px var(--color-dark);
}
@media (prefers-color-scheme: dark) {
textarea {
box-shadow: 0 0 0 1px hsla(0deg 0% 80% / 60%);
}
textarea:focus {
box-shadow: 0 0 0 2px var(--color-light);
}
}
</style>
<label>
<span class='block text-1 mb-3 font-semibold'>
${label}
</span>
<textarea id='${id}' name='${name}' type='${type}' class='mb0 p-2 si-100 leading3'></textarea>
</label>
`
}export default function TextInput ({ html, state }) {
const { attrs } = state
const { id, label, name, type } = attrs
return html`
<style>
input {
background-color: transparent;
box-shadow: 0 0 0 1px hsl(0deg 0% 30% / 50%);
}
input:focus {
outline: none;
box-shadow: 0 0 0 2px var(--color-dark);
}
@media (prefers-color-scheme: dark) {
input {
box-shadow: 0 0 0 1px hsla(0deg 0% 80% / 60%);
}
input:focus {
box-shadow: 0 0 0 2px var(--color-light);
}
}
</style>
<label>
<span class='block text-1 mb-3 font-semibold'>
${label}
</span>
<input id='${id}' name='${name}' type='${type}' class='mb0 p-2 si-100' />
</label>
`
}Great, now we’ve got some components that look good in our blog template in light or dark mode.
Creating a Comment
Now that we have some API routes to store our comments in a database, let’s update our post page to create comments. Open up app/pages/posts/$$.mjs as we are going to add a few lines.
First, we’ll need to pull more data from the store in order to populate the comment section.
const { comment = {}, post, problems = {}, slug = '' } = storeWait, hold up, why are we pulling the comment data from the store if this is a new comment? Well, it’s simple. If the user submits a new comment and there is a problem either on the server or with validation, we’ll need to repopulate the comment form to avoid them having to re-type everything. We’re not monsters.
Remember always validate your inputs on the client and on the server.
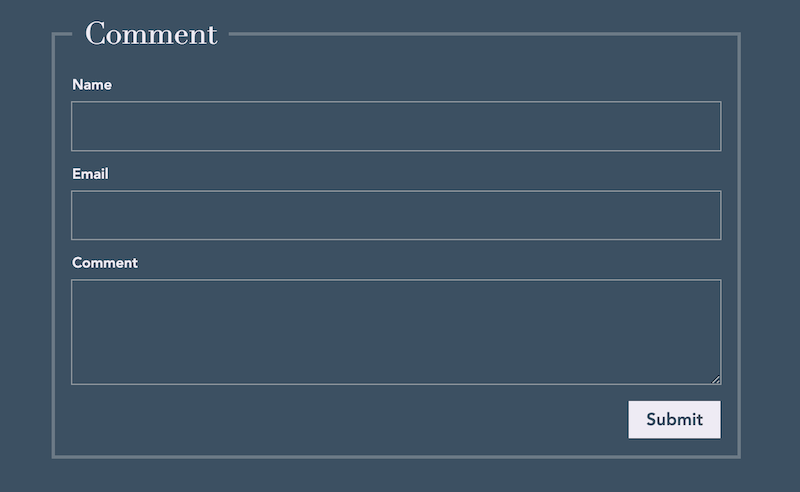
As well we’ll add a section underneath our blog post that will provide a form for the user to comment on our post.
<enhance-form
    action="/comments/${comment.key}"
    method="POST">
    <div class="${problems.form ? 'block' : 'hidden'}">
    <p>Found some problems!</p>
    <ul>${problems.form}</ul>
    </div>
    <field-set legend="Comment">
    <text-input label="Name" type="text" id="name" name="name"
     value="${comment?.name}"></text-input>
    <text-input label="Email" type="email" id="email" name="email"
     value="${comment?.email}"></text-input>
    <text-area label="Comment" type="text" id="comment" name="comment"
     value="${comment?.comment}"></text-area>
    <input type="hidden" id="slug" name="slug" value="${slug}" />
    <submit-button style="float: right"></submit-button>
    </field-set>
</enhance-form>
Expand for the full source code:
export default function ({ html, state }) {
 const { store } = state
 const { comment = {}, post, problems = {}, slug = '' } = store
 const { frontmatter } = post
 const { published = '', title = '', rating = '' } = frontmatter

 return html`
     <site-layout>
       <article class="font-body leading4 m-auto p0 p5-lg">
         <h1 class="font-heading font-bold mb0 mb4-lg text3 text5-lg tracking-1 leading1 text-center">${title}</h1>
         <p class='text-center mb0 mb4-lg'>${published}</p>
         <section slot="doc">${post.html}</section>
         <p class='mb0 mb4-lg'>${rating} out of 5 stars</p>
       </article>
       <enhance-form
         action="/comments/${comment.key}"
         method="POST">
         <div class="${problems.form ? 'block' : 'hidden'}">
           <p>Found some problems!</p>
           <ul>${problems.form}</ul>
         </div>
         <field-set legend="Comment">
           <text-input label="Name" type="text" id="name" name="name" value="${comment?.name}" errors="${problems?.name?.errors}"></text-input>
           <text-input label="Email" type="email" id="email" name="email" value="${comment?.email}" errors="${problems?.email?.errors}"></text-input>
           <text-area label="Comment" type="text" id="comment" name="comment" value="${comment?.comment}" errors="${problems?.comment?.errors}"></text-area>
           <input type="hidden" id="slug" name="slug" value="${slug}" />
           <submit-button style="float: right"></submit-button>
         </field-set>
       </enhance-form>
     </site-layout>
 `
}
What’s a slug?
Keen readers may have noticed a hidden field in our comment form called slug. In web parlance, a slug is the last part of the URL address that serves as a unique identifier of the page. We need to save the post URL as part of the comment for later when we want to display comments under our post.
In order for app/pages/posts/$$.mjs to have access to the slug we will need to populate it in our store by adding it to the return statement in app/api/posts/$$.mjs. Luckily, the request object passed to our GET handler makes it easy to provide a slug via req.path.
 return {
   json: {
     post,
     slug: req.path
   }
 }
Redirecting POST /comments
When scaffold runs it creates a POST /comments API route for you in app/api/comments.mjs. When the POST route runs to completion it will redirect the user back to the /comments UI route but we want to go back to the blog post we were reading instead. This will require a few minor changes to the POST route.
On the line under the post function declaration let’s grab the value of the slug the user submitted.
export async function post (req) {
 const slug = req.body.slug
Then anywhere you see location: ‘/comments’ replace it with location: slug.
Great, now our comment form’s hidden slug input value is properly populated and our API is re-directing you back to the page you were reading. Go ahead and submit a new comment on one of your blog posts, and it will be stored in the database.
Reading Comments from the Database
The next challenge is reading all of the comments from the database. Once again, scaffold comes to the rescue: It has already written the database access layer for you. In app/models/comments.mjs you will find all the methods you need in order to create, read, update, delete or list comments stored in the database. In our case, we’ll only need to list the comments.
Open up app/api/posts/$$.mjs and import the getComments function to get a list of all the comments in the database.
import { getComments } from '../../models/comments.mjs'Then before the return in that file, we’ll query the database for all the comments and filter them based on the current page that is being viewed.
 const comments = (await getComments())
   .filter(comment => comment.slug === req.path)
And finally, update the return statement at the end of the file to include our comments array.
return {
  json: {
    comments,
    post,
    slug: req.path
  }
}
Expand for the full source code:
import { readFileSync } from 'fs'
import { URL } from 'url'
import { Arcdown } from 'arcdown'
import HljsLineWrapper from '../../lib/hljs-line-wrapper.mjs'
import { default as defaultClassMapping } from '../../lib/markdown-class-mappings.mjs'
import { getComments } from '../../models/comments.mjs'

/** @type {import('@enhance/types').EnhanceApiFn} */
export async function get(req) {
 // reinvoked each req so no weird regexp caching
 const arcdown = new Arcdown({
   pluginOverrides: {
     markdownItToc: {
       containerClass: 'toc mb2 ml-2',
       listType: 'ul',
     },
     markdownItClass: defaultClassMapping,
   },
   hljs: {
     sublanguages: { javascript: ['xml', 'css'] },
     plugins: [new HljsLineWrapper({ className: 'code-line' })],
   },
 })

 const { path: activePath } = req
 let docPath = activePath.replace(/^\/?blog\//, '') || 'index'
 if (docPath.endsWith('/')) {
   docPath += 'index' // trailing slash == index.md file
 }

 const docURL = new URL(`../../blog/${docPath}.md`, import.meta.url)

 let docMarkdown
 try {
   docMarkdown = readFileSync(docURL.pathname, 'utf-8')
 } catch (_err) {
   console.log(_err)
   return { statusCode: 404 }
 }
 const post = await arcdown.render(docMarkdown)

 const comments = (await getComments()).filter(comment => comment.slug === req.path)

 return {
   json: {
     comments,
     post,
     slug: req.path
   },
 }
}
Pulling it all together
Now that the store is populated with all the values we need to display comments we can update our app/pages/posts/$$.mjs file one more time.
First, we’ll need to add the comments to the data we pull from the store.
const { comments = [], comment = {}, post, problems = {}, slug = '' } = storeThen under the enhance-from tag we’ll add a new section which lists all the comments the blog post has received so far.
<h2 class="font-heading mt4 pl0 pr0 pl5-lg pr5-lg text1 text3-lg tracking-1 leading1">
  ${comments.length} ${comments.length === 1 ? 'comment' : 'comments'}:
</h2>
<dl class="font-body leading4 m-auto p0 p5-lg">
    ${comments.map(comment =>
      `<dt class="mb-6">
        <span class='font-semibold'>${comment.name}</span>
        <span class='text-1'>on ${comment.date}</span>
       </dt>
    <dd class="mb4">${comment.comment}</dd>`).join('')}
</dl>
Expand for the full source code:
export default function ({ html, state }) {
 const { store } = state
 const { comments = [], comment = {}, post, problems = {}, slug = '' } = store
 const { frontmatter } = post
 const { published = '', title = '', rating = '' } = frontmatter

 return html`
     <site-layout>
       <article class="font-body leading4 m-auto p0 p5-lg">
         <h1 class="font-heading font-bold mb0 mb4-lg text3 text5-lg tracking-1 leading1 text-center">${title}</h1>
         <p class='text-center mb0 mb4-lg'>${published}</p>
         <section slot="doc">${post.html}</section>
         <p class='mb0 mb4-lg'>${rating} out of 5 stars</p>
       </article>
       <enhance-form
         action="/comments/${comment.key}"
         method="POST">
         <div class="${problems.form ? 'block' : 'hidden'}">
           <p>Found some problems!</p>
           <ul>${problems.form}</ul>
         </div>
         <field-set legend="Comment">
           <text-input label="Name" type="text" id="name" name="name" value="${comment?.name}" errors="${problems?.name?.errors}"></text-input>
           <text-input label="Email" type="email" id="email" name="email" value="${comment?.email}" errors="${problems?.email?.errors}"></text-input>
           <text-area label="Comment" type="text" id="comment" name="comment" value="${comment?.comment}" errors="${problems?.comment?.errors}"></text-area>
           <input type="hidden" id="slug" name="slug" value="${slug}" />
           <input type="hidden" id="key" name="key" value="${comment?.key}" />
           <submit-button style="float: right"></submit-button>
         </field-set>
       </enhance-form>
       <h2 class="font-heading mt4 pl0 pr0 pl5-lg pr5-lg text1 text3-lg tracking-1 leading1">${comments.length} ${comments.length === 1 ? 'comment' : 'comments'}:</h2>
       <dl class="font-body leading4 m-auto p0 p5-lg">
         ${comments.map(comment => `<dt class="mb-6"><span class='font-semibold'>${comment.name}</span> <span class='text-1'>on ${comment.date}</span></dt>
           <dd class="mb4">${comment.comment}</dd>`).join('')}
       </dl>
     </site-layout>
 `
}
Demo

Wrapping Up
Adding commenting functionality to the blog template is not too difficult. However, it does avoid topics like authenticating the submitter and approving comments but this post was getting pretty long so we’ll defer those topics to another post.
If you want to learn more about the scaffold command, I suggest reading our earlier blog post on the topic. Have you tried out deploying a blog template yet? Let us know what you think on Discord or Mastodon.